Polly the Penguin Free Sewing Pattern and Tutorial
At times like these its so important to keep busy and to take pleasure in the simple things. While we are all keeping ourselves tucked up at home, why not take up a new craft, or start a little project? Or perhaps you need something to keep the kids entertained?
Polly Penguin is super keen to help, and wants to offer you the sewing tutorial to make her for free!
Here you will find full instructions, including a link to the printable templates. All you need to provide is the materials.
If you enjoy making Polly Penguin, be sure to visit our Etsy shop, where all our downloadable sewing tutorials are now half price.
https://www.etsy.com/uk/shop/OddlyWildUK?section_id=23245456
And don't forget to take photos and tag us in them. We love seeing your creations.

Materials
Fabric colours are only suggestions. Feel free to mix it up a little!
To make the full-size penguin you’ll need the following materials:
- Black, grey and white felt
- Thread in black, grey and white
- Toy stuffing
- Needle
- A pair of safety eyes
- Scissors
- Pins
- Topstitch thread in black
Printing the Pattern templates

Sewing stitches you need to use

If you are not familiar with these stitches - fear not, simply head over to Google (other search engines are also available) or hop on to Youtube for easy-to-follow tutorial videos that will show you how to do each stitch.
Step-by-Step Instructions

05. Using a running stitch in matching thread, sew both to the main body.
06. Take the beak and use a couple of running stitches to fix in place. Make two small holes in the felt where the eyes will sit. It is easier to cut these with a scalpel knife, however you can use scissors instead. The holes should be just large enough that you can push the eyes through.

07. Push the eye fronts through the holes
08. Attach the eye backs to secure in place, making sure they are pushed down as far as they will go.
09. Next, take two of the arm lengths and place together horizontally. Starting on the top edge, roughly 2.5cm from the end of the arm, sew a whip stitch around the edge.
10. Continue around the arm until you are on the opposite side, stopping approx. 2cm from the end.

11. Stuff the arm with toy padding.
12. To seal the opening sew a running stitch diagonally from one side to the other. This should run from where you finished the whip stitch to where you started. This will leave a small flap, which will make it easier to attach to the body.
16. Position the arms in place as you go, by inserting the flat base flap between the two body pieces.
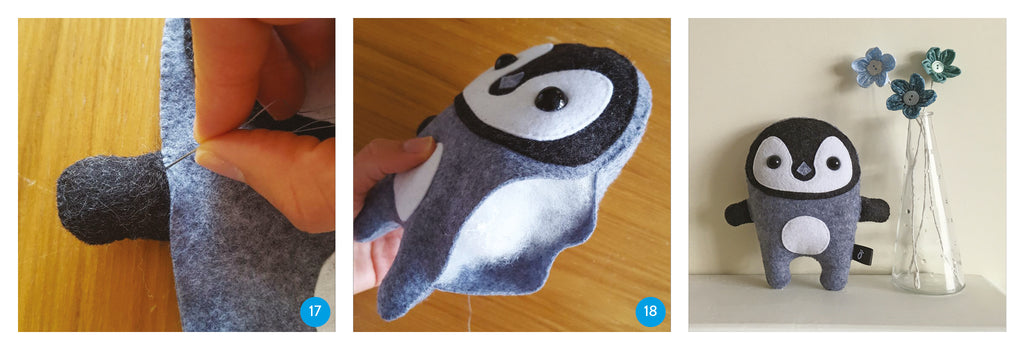
19. Voila - you should have you're own little Polly the Penguin to keep you company.
Selling Items Made with this Pattern or Creating Derivative Works
This pattern may be used to create handmade toys to sell, but items may not be mass-produced. Please give credit to OddlyWild with “pattern by oddlywild” and a link to our website, www.oddlywild.co.uk on your tags and listings.
If you modify the pattern or use certain pieces to create another pattern, still credit OddlyWild, as these are considered derivative works.
This design is protected by copyright law (© 2020) and may not be reproduced in any form. Reproduction of this design, either in part or whole, or distribution of this pattern electronically or by hard copy is strictly prohibited.